Recipe: Miss Trixie’s Gin-Fuelled Coconut Mother’s Day Cake

Sure, the sheer labour of love is a great drawcard when you're making something for Mum rather than buying some second-rate gift from the knick-knack shop, but you also don't want your DIY creation, in this case a cake, to end up in a 'nailed it' meme. There are several ingredients to getting it right, the first is the guidance of bonafide Cake Queen Miss Trixie and the second is booze—because nothing says Happy Mother's Day like a gin-doused cake, right?
Chuck on that apron and give Mum the gift of your time and Miss Trixie's Boozy Gin Coconut Cake.
Ingredients
Coconut Cake
- 250g butter
- 300g caster sugar
- 1 tsp vanilla extract
- 4 eggs, at room temperature
- 300g self-raising flour
- 80g desiccated coconut
- 1 cup milk
Swiss Meringue Buttercream
- 375g caster sugar
- 200g egg whites, at room temperature
- 500g unsalted butter, softened
- 1 ½ tsp vanilla bean paste
- ¼ tsp salt
- Pink food dye or any colour you prefer
Gin Lime Curd
- 3 limes, zest and juice
- 125g caster sugar
- 60g unsalted butter, chopped into cubes
- 2 tbsp gin
- 3 eggs, at room temperature and lightly whisked
Decorations
- Fresh edible flowers
- Dried edible flowers
Equipment
- 3x 6-inch round baking tins
- Electric Stand Mixer, e.g. a Kitchenaid or alternatively, hand-held beaters
- Rubber spatula
- 9-inch round cake board
- Pallet knife
- Piping bags
- Piping nozzles (small open star tip, a medium open star tip and a large star tip)
- Cake turntable
- Acrylic scraper
Method
Coconut Cake
- Preheat your oven to 160 degrees, fan-forced (180 degree conventional).
- Grease 3x 6-inch tins with greaseproof paper.
- Beat butter, sugar and vanilla with an electric beater until light, fluffy and pale in colour. Add eggs one at a time and beat. Between each addition of the eggs, scrape down the sides of the bowl.
- Add the flour, coconut and milk in two batches and continue to beat. Once incorporated, pour into your pre-prepared tin.
- Bake in the oven for 40 – 50 mins or when the cakes are tested with a skewer, the skewer comes out clean. Allow the cakes to cool in the tin for 15 mins before turning out onto wire racks to cool completely. Set aside.
Swiss Meringue Buttercream
- Place egg whites and sugar in a heatproof bowl over a saucepan of simmering water. Ensure the bottom of the bowl does not touch the water.
- Using a whisk, whisk the egg whites and sugar together until the sugar dissolves. To check if the sugar has dissolved, carefully rub the mixture between your fingers. You shouldn’t be able to feel any granules of sugar.
- Transfer the egg white mixture to the bowl of an electric mixer and beat on high for 20 – 25 minutes or until the mixture has come down to room temperature. The mixture should now be stiff and bright white.
- Add butter and beat on high until creamy and combined. Be sure to scrape the bowl to ensure all the meringue is incorporated. It’s at this point where the mixture might look like it's curdling – do not stress! Continue to beat and it will come back together beautifully.
- Add vanilla bean paste and salt.
-
Store in an airtight container in the fridge until required.
Gin Lime Curd
- In a heatproof bowl, add the lime juice, lime zest, caster sugar, butter and gin and place over a pan of gently simmering water. Like the buttercream, make sure the water is not touching the bottom of the bowl.
- Gently stir the mixture until all of the butter has melted.
- Once the butter has melted, add your lightly beaten eggs and whisk as you add them. Continue whisking the mixture until the mixture starts to thicken like a custard. Don’t walk away from the bowl, just keep whisking.
- When the mixture is creamy and coats the back of a spoon, pour the curd through a sieve into a bowl and then transfer to sterilised jars or a clean airtight container. Leave to completely cool before use.
Assembly
- Take cooled cakes and trim to size – if they are looking a little uneven, take a long thin knife and carefully cut until they are flat and even.
- Using your pallet knife or piping bag, place a dollop of buttercream onto your cake board and press the first layer of cake on to the board.
- Once the first layer of cake is fixed to your cake board, thickly spread buttercream onto the cake. Add a good dollop of gin curd and pop the next layer of cake on top. Make sure you don’t spread your curd to the edges otherwise the cakes will slide. You need a ring of buttercream around the gin to hold it in, much like a swimming pool.
- Repeat the stacking process until all the cakes have been stacked. Using a pallet knife, gently start to spread buttercream around the edges and side of the cake. The first layer of buttercream only needs to be thin and is called a crumb coat. It is designed to catch any loose crumbs and fix them into place. Place cake in the fridge for 15 mins to set.
- Whilst the cakes are in the fridge, prepare your next batch of buttercream by adding pink food dye to the mixture.
- Take cake from freezer and lather with pink buttercream. Start from the top of the cake, with the buttercream coming down the sides of the cake. This layer should be thicker than your crumb coat and completely cover the cake.
- Using an acrylic or thin metal scraper parallel to the cake, smooth the edges and remove any excess buttercream. Continue to smooth and patch over any holes.
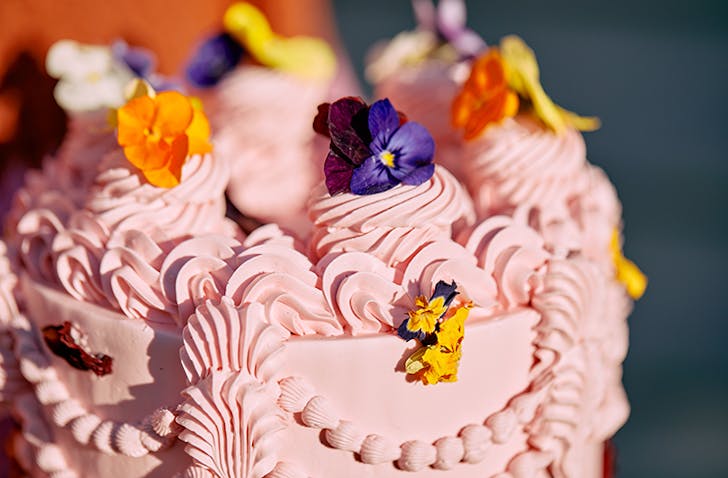
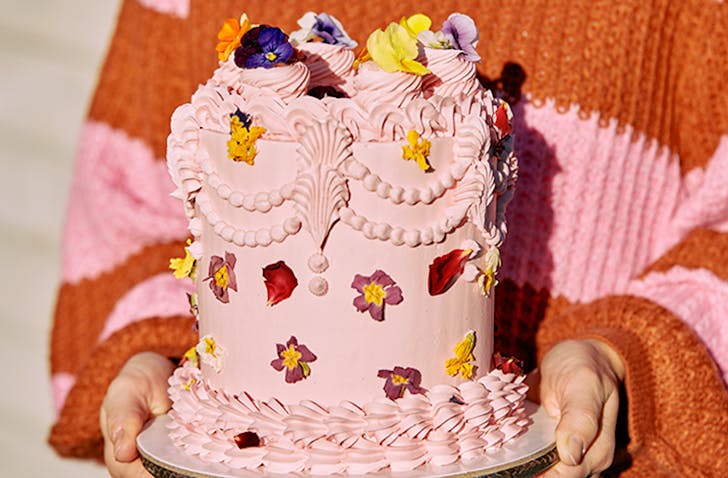
- Now onto our vintage piping! Starting with your large star tip, pipe around the base of the cake and then again on the top, following the curve of the cake.
- Switch to your medium open star tip and pipe another ring around the base of the cake (just on top of the first layer) and then again on the top, on the inside of the first piping.
- For the next part, you want to mark out on your cake where you want your piped features to go. Using the medium open star tip, pipe six double ‘shells’ evenly around the cake. Then pipe six rosettes on the top of the cake (on top of the piping you did earlier!).
- Switch to your small star tip and gently pipe a two curved lines between your shells.
- Finish your cake with edible flowers—place the fresh ones on the top and the dried ones around the sides.
Tips
- Swiss meringue buttercream is a labour of love and can be tricky sometimes! When you add your butter, it might look like it’s curdling – do not stress, it will come back together if you continue to beat.
- I use Colour Mill food dyes – the colours are bright and like no other food dyes on the market. I used the colour ‘Rose’ for this recipe.
- Store bought egg whites are the best for swiss meringue buttercream. It will limit the wastage of egg yolks and save time separating eggs. You will find egg whites in cartons in the fridge at your local supermarket.
- Edible flowers aren’t readily available at the supermarket. I love the Petite Ingredient jars of dried flowers and fresh flowers. I always have a jar in my pantry for emergency cake decorating.
Keep it boozy and make Mum this vodka pasta.
Image credit: Annika Kafcaloudis